Adobe Photoshop is a graphics editing program developed and published by Adobe Systems.
Photoshop files have default file extension as .PSD, which stands for “Photoshop Document.” A PSD file stores an image with support for most imaging options available in Photoshop. These include layers with masks, color spaces, ICC profiles, CMYK Mode (used for commercial printing), transparency, text, alpha channels and spot colors, clipping paths, and duotone settings. This is in contrast to many other file formats (e.g. .JPG or .GIF) that restrict content to provide streamlined, predictable functionality. A PSD file has a maximum height and width of 30,000 pixels, and a length limit of 2 Gigabytes.
Starting Photoshop
To start Photoshop from the Windows Start menu, choose Start→All Programs→Adobe Photoshop Alternatively, you can double-click the Adobe Photoshop desktop shortcut to start the program.
Creating a New Document
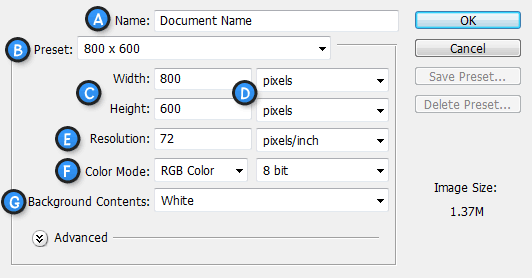
To create a new document in Photoshop, select File > New from the Menu Bar.
A dialog box will appear such as the one shown below:

G. Background Contents – Set up the background for your document.
The dialog shown above would create an 800x600px document with a white background. The document name would be “Document Name”, and the resolution would be perfect for on-screen work.
The Work Area
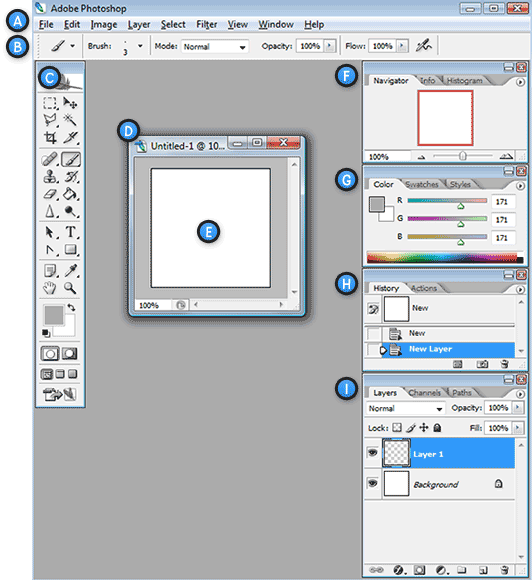
Upon first glance, Photoshop can be a big and scary place. Let’s break the Work Area into smaller components to make things easier to understand:

F. Navigator – A small version of the current documents active image area. Used for navigating large images, or when zoomed in.
G. Color Palette – A palette used to select foreground and background colors for painting / drawing with.
H. History – Constantly updating record of previous changes made inside of a document. Can be used to reverse steps taken (Undo).
I. Layers – If Photoshop were a giant cheeseburger, layers would be the toppings & condiments. Layers in Photoshop allow you to work on a single canvas, letting some things appear above or below others.
This is just a glance of what the innards of Photoshop are like. We’ll cover everything in more detail in subsequent lessons.
Saving and Closing a Photoshop Document
To save a Photoshop Document, select File > Save from the Menu Bar. When saving, be sure to enter a file name you will recognize, and also select “Photoshop (*.PSD)” as the format. Doing so will ensure that the document will retain it’s Photoshop Document Attributes and Layer Data so that you may work with it later.
