
Image format
The choice of image format that you use on your webpages can be a very important one. The three choices that you have are Graphics Interchange Format (GIF), Joint Photographic Experts Group (JPEG) or Portable Network Graphics (PNG) – all of which have their best use and of course their worst! A format that you should never use, however, is the Bitmap (BMP) as these files are generally so big that no visitor will wait for them to load!
GIF format is used when you wish to display a graphic made of very few colors such as logos, or when blocks of one color feature in the image, e.g. diagrams and cartoons. GIF images cannot have more than 256 colors, but you can assign one color to be displayed as transparent. GIF files are also used to create short animated files.
JPEG: This graphics format is generally the format you would use for photographs. They are used when you wish to display millions of colors, but due to the compression algorithms used they are not suited for images with blocks of the same color.
PNG format can be used virually any time you would normally use a GIF. They can contain as many colors as a JPG, but when using the same number of colors as a GIF they generally produce smaller file sizes. PNG transparency is supported in varied ways depending on the browser, and animation is not supported.
Below are examples of the same image in various formats. The file size of the image, as well as the format, is indicated below the image. Notice how the file size and quality of the image varies considerably depending on the format.
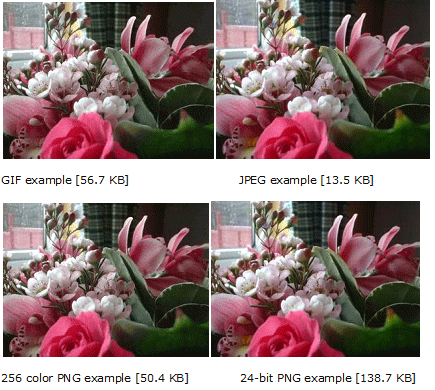
As can be seen from the examples above, the best format to use for a photograph is obviously a JPEG. We had to cheat in the examples as the real example files were far too big, so we subsituted them with JPEGs, but as there is no difference in file quality it doesn’t matter.
Image Attributes:
Following are most frequently used attributes for <img> tag.
- width: sets width of the image. This will have a value like 10 or 20%etc.
- height: sets height of the image. This will have a value like 10 or 20% etc.
- border: sets a border around the image. This will have a value like 1 or 2 etc.
- src: specifies URL of the image file.
- alt: this is an alternate text which will be displayed if image is missing.
- align: this sets horizontal alignment of the image and takes value either left, right orcenter.
- valign: this sets vertical alignment of the image and takes value either top, bottom orcenter.
- hspace: horizontal space around the image. This will have a value like 10 or 20%etc.
- vspace: vertical space around the image. This will have a value like 10 or 20%etc.
- name: name of the image with in the document.
- id: id of the image with in the document.
- style: this will be used if you are using CSS.
- title: specifies a text title. The browser, perhaps flashing the title when the mouse passes over the link.
- ismap and usemap: These attributes for the <img> tag tell the browser that the image is a special mouse-selectable visual map of one or more hyperlinks, commonly known as an image map. We will see how to use these attributes in Image Links chapter.
The image tag is written as <img>. This is used to display an image in an HTML document. The image tag is a singular tag, which means it need not be closed as </img>. But, the latest version of HTML does not support this. In the latest version, the image tag is to be closed by putting a (/) backslash, e.g. <img/>.
The image tag is written as <img>. This is used to display an image in an HTML document. The image tag is a singular tag, which means it need not be closed as </img>. But, the latest version of HTML does not support this. In the latest version, the image tag is to be closed by putting a (/) backslash, e.g. <img/>.
The Image tag is similar to the anchor tag as discussed earlier, in the sense that the image tag alone does not perform any function. It has to include various attributes so that the image can be displayed on the page.
Example:
<img attributes />
Attributes of <img> Tag
Src
Src is the source attribute. It indicates the location or the path of the picture to be displayed on the web page.
Example:
<img src=”c:\images\img1.jpg” />
Alt
lt is an attribute, which displays an alternative text if the picture is not displayed on the web browser.
<img src=”c:\images\img1.jpg alt=”this is my image” />
Width
The width attribute determines how wide the picture is to appear on the web page.
<img src=”c:\images\img1.jpg alt=”this is my image” width=105 />
Height
The height attribute determines the height of the picture that has to appear on the web page.
<img src=”c:\images\img1.jpg alt=”this is my image” height=100 />
Align
The align attribute sets the alignment or the position of the picture in relation to the text around it.
<img src=”c:\images\img1.jpg alt=”this is my image” align=left />
Border
The border attribute sets a border around the images. A border value greater than 0 puts a border around the image.
<img src=”c:\images\img1.jpg alt=”this is my image” align=left border=2/>
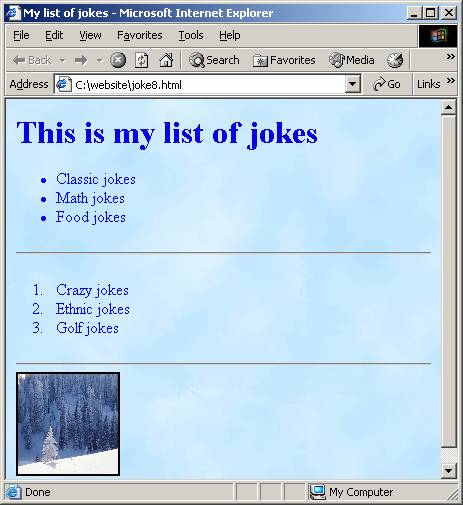
The following is an example of a web page with an image:
<html>
<head>
<title> My list of jokes </title>
</head>
<body background =”myimage.jpg” text = “blue”>
<h1>This is my list of jokes </h1>
<ul>
<li>Classic jokes </li>
<li>Math jokes </li>
<li>Food jokes</li>
</ul> <hr/>
<ol>
<li>Crazy jokes</li>
<li>Ethnic jokes</li>
<li>Food jokes</li>
</ul> <hr/>
<img src=”image1.jpg” alt=”my image” height=100 width=100 border=2/>
</body>
</head>
Previous |
Solved Examples |
Unsolved Questions for Practice |
Next |
